

A blurred figure walks past framed text-based artworks on a white gallery wall. Image courtesy of iSAW Company.
Museums are responsible for all objects in their custody - whether that item is in a permanent collection, on loan, or temporarily on receipt for another purpose.
Standard museum practice dictates that all items in a museum's possession are tracked at all times. For items on loan, loan forms are used to formally document the agreement between the lender and the museum. Gift Agreements are used for objects being gifted to a museum, tracked in the museum Collections Management System (CMS) as an accession. It is also important to track and document items brought into a collection for other purposes, such as objects coming into the collection for research purposes or conservation.
While there are many reasons a museum may want to bring an item in through a temporary custody process, the most common is for items obtained in consideration of acquisition. Whether a gift, bequest, or purchase, these items must be tracked in some manner while the accession is in process. This process helps a museum mitigate risks associated with abandoned property and aids in minimizing “found in collection” issues in the future.
Temporary Custody Process
All museum processes require good planning, clear policies and procedures, and consistency. The temporary custody process is no exception.
Your collections policy should include a statement about temporary custody and clarify how you deal with initial custody of an item prior to confirming the acquisition. Additionally, include a clear procedure on how you plan to implement your policy. Every institution should consistently follow these procedures to ensure the proper documentation in all collections.
Before accepting an item, museum staff should gather all appropriate information about the item and the owner. This includes, but is not limited to:
- Owner name and contact information, including email, phone number, and address
- Catalog information about the item(s), including the title, description, provenance or any known history of the item(s), date, dimensions, medium, etc.
- An insurance value for the item(s) whenever possible
Using this information, a temporary custody agreement and receipt can be created and issued. Along with the above information, the receipt also needs to include the purpose of the custody, specific dates related to the custody (including the date it will physically be in the custody of the museum), as well as a general date that the receipt period will end. The receipt should also cover the specific conditions that govern this custody: who is responsible for insurance, who is responsible for pick up/delivery, what happens if the item is not picked up at the end of the period, and what happens if this item is accepted as an accession.
At the end of the custody period, the museum will either return the item and terminate custody or, in the case of an object gifted to the museum, will replace the temporary custody agreement with a gift agreement. Alternatively, the museum may determine to borrow the item for a definite period, converting the temporary custody into a loan.
Using CatalogIt to Track Custody
Using the Temporary Custody Profile in CatalogIt is an easy and efficient way to track items coming in on a temporary receipt.
Start by selecting the "Temporary Custody" Icon under the "Profiles" menu:After you select “Temporary Custody,” select the “Create a New Temporary Custody” button:
After you select “Temporary Custody,” select the “Create a New Temporary Custody” button.

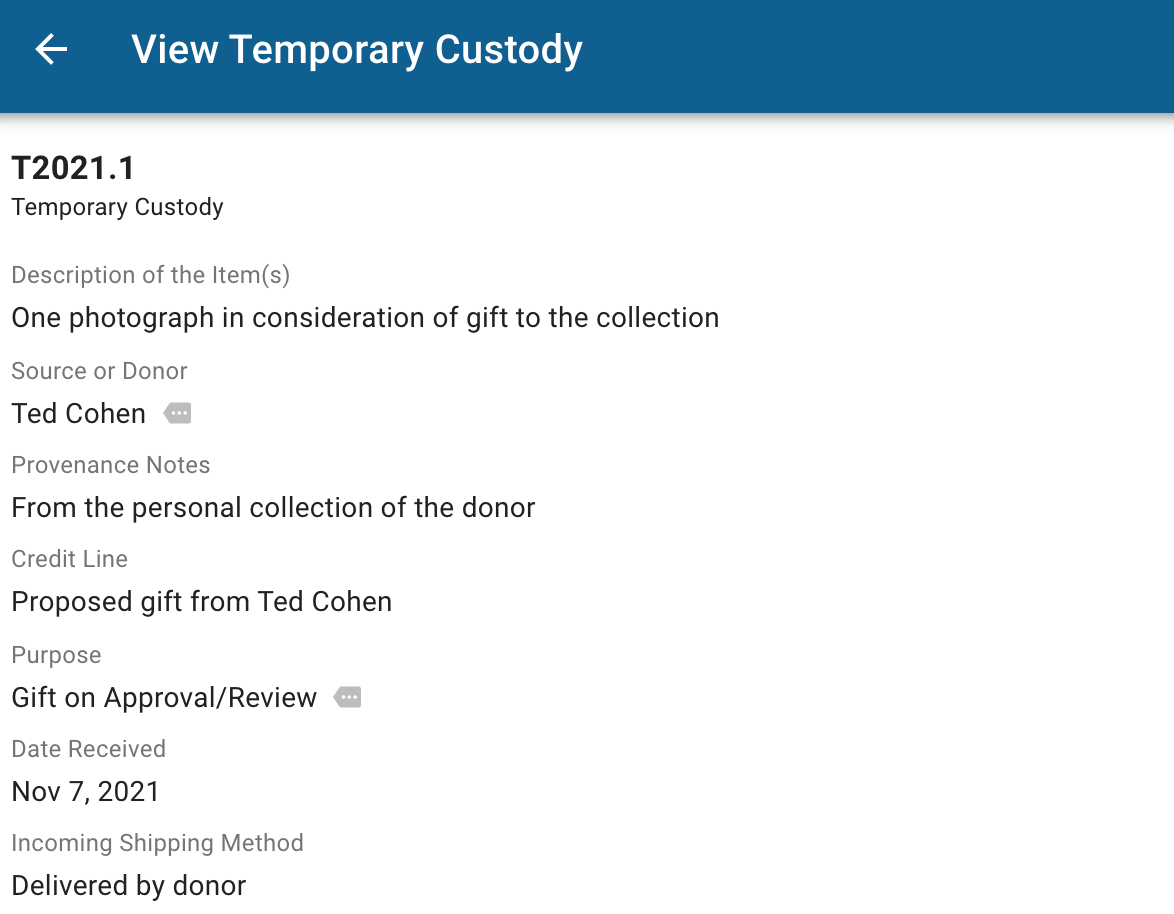
From here, you will be prompted to enter information for the object. CatalogIt will auto-assign the next unique number, for example, “T2021.1”. If you are using a specific numbering schema at your museum, let CatalogIt know by emailing support@catalogit.app so the default can change to your museum’s system.
As you fill out the profile, include a description of the item or group of items coming in, the source (provenance), notes, credit line if it is a gift, purpose of the custody (is this a proposed gift?), and intake dates.
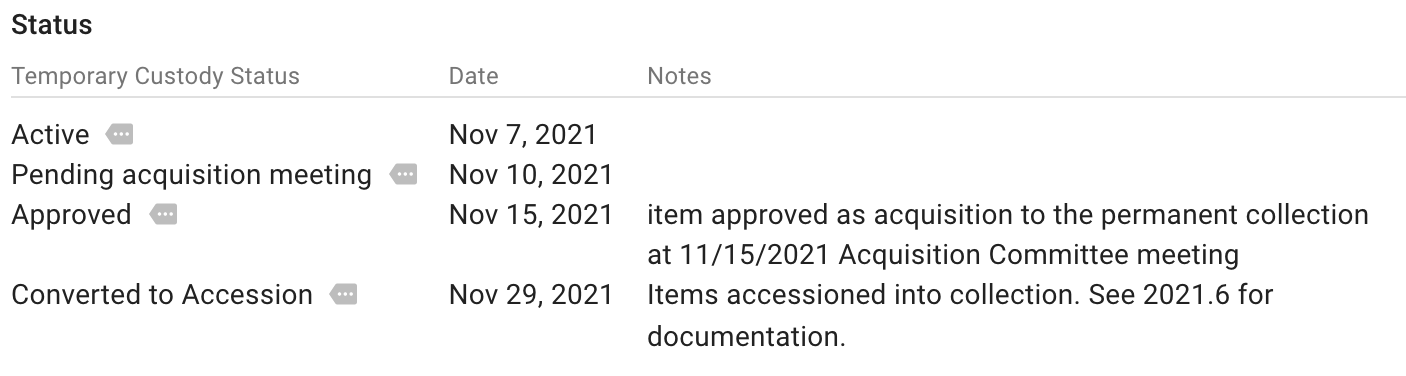
You are also able to track the status of the temporary custody, from the time it is accepted through the process of approval.

Include photographs or scans of the associated legal paperwork (temporary receipt), donor correspondence, appraisals, or other information related to this intake. This is especially useful if you are presenting items at a curatorial or acquisition committee and would like all members to review the most pertinent information.
Track the Specific Items
Once the profile is completed, a corresponding object entry is cataloged in CatalogIt with a corresponding entry ID. In this case, T2021.1.1. If there is more than one item, the next would be T2021.1.2, and so on.
Catalog the items as you would other objects in your collection. Enter value, storage location, condition notes, and dimensions. Including all information that is pertinent to an item’s identification will help with the decision-making process required in order to determine next steps in the acquisition process.

Because this item is not yet in the collection, you would not fill out the acquisition information at the top of the record. Instead, link the Temporary Custody profile to this entry under “Intake” close to the bottom of the record.

This links the item to its Temporary Custody profile.

At this point you can also include the item in any number of folders. If this will be proposed at an upcoming Acquisition Committee meeting, it can be handy to create a folder for the members to review:

Tracking Large Groups of Objects
There are instances where you may stop at the step above. For example, if a museum is taking in a very large group of items for review, it would not be efficient to catalog them all, particularly if there is a chance that many won’t end up in the collection. In this case, you can enter more information in the “Description” field. For example:
“Proposed gift of 200 unframed photographs from the same donor. Photographs depict a variety of subjects related to the ferry system in Norfolk. Items valued by the donor at $25,000. Specific catalog information and documentation included in the temporary custody file in the registrar's office.”
Use the general notes field to include the specific location of the group of items: “Group boxed in 2 banker boxes in Collection Manager's office, temporary intake shelving.”
Take multiple photos of the group of objects and link them to the profile.
If you decide to take the items in this custody agreement as a gift or loan, you will be able to attach the temporary custody profile to the entry later, forever linking the entry to the profile for the future.
Updating the Temporary Custody Profile
The status of items entering your collection on a temporary custody agreement are just that - temporary. For items on consideration of acquisition, once a decision is made to either accession or return, updating the temporary custody profile is simple.
For items deemed not appropriate for the museum’s collections, update the status to indicate this. Perhaps write “donation declined by committee” along with the date. Clearly track the progress of the return to the donor and indicate shipping methods and return dates. Additionally, be sure to update the location for the specific item to indicate it has been returned. While every museum does this differently, a good method is creating a location profile for items returned to the donor or lender. It could be as simple as “returned,” including the return date in the location expansion panel and using the notes to indicate it has been returned to the donor.
Temporary Custody Converted to Accession
The first step in converting an item in custody to an accession is to update the status in the Temporary Custody Profile. Be sure to indicate when the intake was approved, and after an item is physically accessioned, include that status as well.
Once the Temporary Custody Profile is up to date, you are ready to update the entry or entries.
If you have already cataloged an item as an entry in CatalogIt, you can easily add in the new accession information. It is important to retain the link between this entry and the Temporary Custody Profile as a record of the history of the activity of your museum, and to clarify the provenance of each object in your collection.
In edit mode, copy the temporary custody entry ID number and paste it into the “Other Number” field, located in the “Other Names and Numbers” expansion panel, just below the “Lexicon” expansion panel. Create a “Number Type” called “Old Temporary Custody Number” (this is a user-defined profile - you are able to call this number type anything you wish. Just be sure to use the same value consistently).

After you have done this, you can delete the Temporary Custody Number from the entry ID field. Add the accession information in the “Acquisition” expansion panel just as you would for any other accession. Creating the new accession will auto-assign the next consecutive entry ID. When creating the new Accession profile, be sure to include a note clarifying that the accession represents a converted Temporary Custody Profile. Include the old temporary custody profile ID in the accession.
Now your entry is linked to both the new accession as well as the old Temporary Custody Profile. Use the “Notes” field in the “Intake” expansion panel to indicate that the temporary custody was converted to this accession.
Take the time to review all of your catalog information once your item is accessioned. Update the location and fill in any blanks in the cataloging that you may not have included for the acquisition committee. Add any needed tags to clarify workflow and remove the item from the Acquisition Committee folder.
If you only entered the Temporary Custody Profile for a group of items but did not catalog each item individually in preparation of your Acquisition meeting, accession your entries just as you would any other accession. Be sure to link the entry to the existing Temporary Custody Profile and enter all the appropriate documentation to ensure the provenance of the item is documented clearly.