

Following is a brief discussion of the Accession process, including suggestions on how a museum might use the Accession features of CatalogIt. This document describes our recommended accession and entry/object ID numbering conventions and processes for using them with CatalogIt. Bear in mind that CatalogIt doesn’t require you to follow these recommendations- you are free to assign the accession and entry/object ID numbers however you wish.
OVERVIEW
An “accession” typically refers to an object or a group of objects (a “lot”) acquired at the same time from the same source. For example, the Jones family donated a miner’s helmet on February 16, 2018, and the next day, the Ramirez family donated a box of items including a ceramic jug, a saddle and a pair of spurs. The helmet would be one accession and the box of items would be one accession. The Accession Record documents the receipt of these items- who they came from and when, who received them at the museum, their value, notes as to how the donor wishes them to be displayed, etc.
Most museums in the US have adopted a three-part numbering system, the first two parts of which refer to the accession. The first number is typically the year the items were received and the second part is the sequential number assigned to each group of objects received through the year. Using the above examples, let’s assume that the Jones donation was the third lot received in 2018; therefore, the accession number would be 2018.3. The Ramirez donation would be assigned 2018.4.
The third part of the numbering system is the sequence number that is assigned to each individual item in the lot. The full three-part unique number assigned to a specific item is it’s Entry/Object ID number. With the Jones donation, there was only one item, so the full entry/object ID number would be 2018.3.1. The Ramirez items would be numbered 2018.4.1 for the jug, 2018.4.2 for the saddle, and 2018.4.3 for the spurs (each spur may be further designated by terminating in, “.1” and “.2” or “.a” and “.b” depending on your preference).
There are cases where the three-part system may not be appropriate; for example, if your museum has been in existence for some years but is just beginning to catalog its objects. In this case, there may not be records of where items came from, so the concept described above of an “accession record” may not apply. In a case such as this your museum may determine to assign a two-part number to each item, where the first number is the year it was cataloged, the second number references the order in which it was cataloged and the third number is assigned to each part it has. For example, a number such as 2018.439.1 may refer to a punch bowl which was the 439th object cataloged by the museum in 2018. If there were a ladle that was a part of a set with the bowl, it might be numbered 2018.439.2. This allows each piece to have a separate entry/object ID number. A future version of CatalogIt will provide support for hierarchically relating items together beyond a numbering scheme and discipline.
DEFAULT SETTINGS
CatalogIt defaults to “strict accessioning” utilizing the three-part system described above, but will also allow a museum to set its own pattern, or whether it wants “strict accessioning” enabled or not. With strict accessioning in place, the entry/object ID number must conform to the pattern adopted by the museum and must, therefore, conform to the accession number assigned to the item. With strict accessioning, CatalogIt will suggest the next accession number for a new accession record and the next entry/object ID number for an item once it is tied to an accession record. At the present, you’ll need to notify CatalogIt if you would like your accession numbering pattern set to something other than the default setting, or if you would like “strict accessioning” disabled.
GETTING STARTED
CatalogIt allows you to create the accession record either in advance of cataloging the first item from the batch or as you are cataloging the first item. In either case, you are adding the same information, which method you use just depends on your workflow or preference.
CREATING THE ACCESSION RECORD IN ADVANCE
Often when a donation (or accession) is received there isn't time to catalog the individual items, but it is important to document the receipt of the items and create the electronic record of the accession.
To begin, click on the Main Menu in the upper left corner (the three horizontal bars) and select “Profiles.”
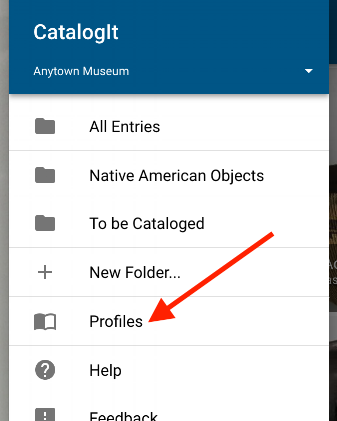
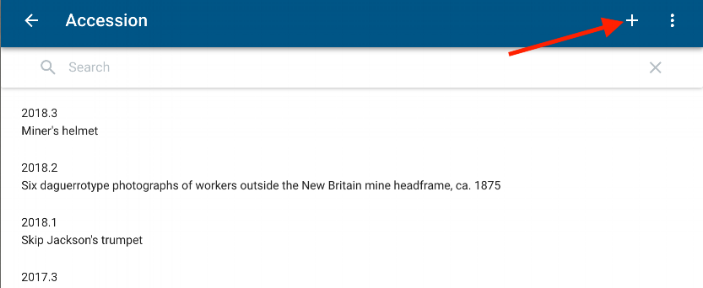
Next, select “Accession,” which will bring up a list of all of your existing accession records. To create a new one, click on the + symbol in the upper right corner; there’s also a “Create New Accession” button at the bottom of the list.
This opens the Create Accession page automatically pre-populated with the next Accession Number. For the Ramirez example described earlier, it would be 2018.4. Enter all the accession information you desire and click “CREATE” in the upper right corner.
This will return you to the list of your accession records, and you will see that the new record you just created is now available. From this point, you can return to the thumbnail view via the main menu to continue with your CatalogIt activities.
ASSOCIATING AN ENTRY WITH AN ACCESSION RECORD
When you are ready to continue with cataloging the item or items from the accession lot, click the orange Create Entry button in the lower right corner and proceed through the steps of adding your photo(s), the name of your entry, and the classification. This will bring you to the Data Entry screen.
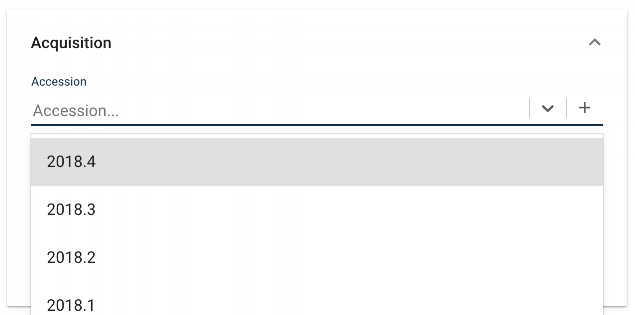
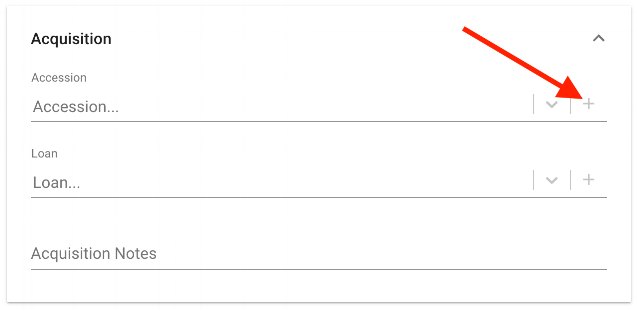
The first few fields in the Data Entry screen relate to the basic description of the item, its use and who is cataloging it. Below “Cataloged By” is a set of fields under the heading, “Acquisition.” Included here is the field, “Accession…” and the field, “Loan…”. Click on “Accession…” to open the list of previously created accession records. Find the record you just created and select it.
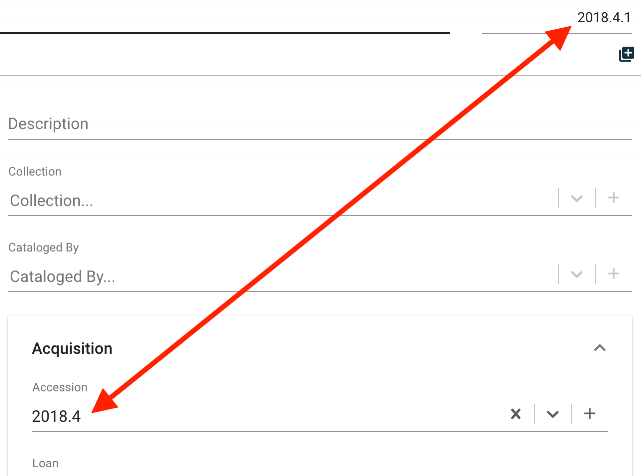
You’ve now attached the accession record to the item. The full new entry/object ID number of the item you are cataloging will be automatically entered in the field in the upper right corner of the Data Entry screen. Using the above example, if this were the jug, CatalogIt would have automatically set the entry/object ID to be 2018.4.1.
Proceed with cataloging the object, utilizing all of the pertinent fields. Be sure to click “Save” in the upper right corner when you are done.
When you proceed to your next item from the group, in our example this would be the saddle, simply select the Accession Number 2018.4 from the drop-down list that appears when you click in the “Accession…” field, thereby associating the object with the existing accession. CatalogIt will automatically assign the entry/object ID to the next item, 2018.4.2.
CREATING THE ACCESSION RECORD AS PART OF A NEW ENTRY
To begin, click the orange Create Entry button in the lower right corner and proceed through the steps of adding your photo(s), the name of your entry, and the classification. This will bring you to the Data Entry screen.
The first few fields in the Data Entry screen relate to the basic description of the item, its use and who is cataloging it. Below that is the heading, “Acquisition.” Click on the heading to expand the group; included here are the fields, “Accession…” and, “Loan…” Click the “+” on the far right side of the accession line.
This will open the Create Accession page with the next accession number preset. Enter all the accession information you desire and click Create. You will see your new accession number in the Accession field, and CatalogIt will have automatically assigned the full entry/object ID number to the item you are cataloging. See “Associating an Entry with an Accession Record” above for additional details.
VIEWING THE ENTRIES WITHIN AN ACCESSION
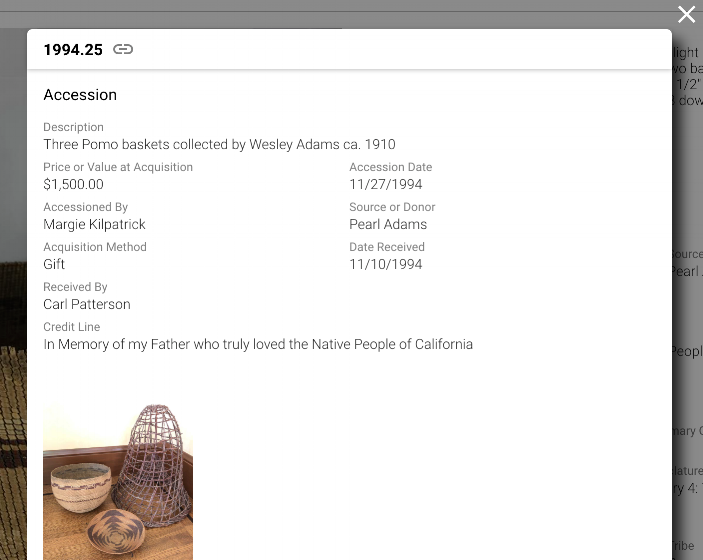
When viewing an Entry, the accession record can be accessed by clicking on the profile flag that appears next to the accession number. Note that certain information from the Accession Record is also projected to the entry view screen.

This opens an overlay window which displays the details of the profile.
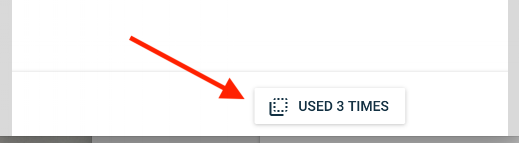
Clicking the link symbol next to the accession number will take you to the accession record, where you can edit it or generate a usage report.
At the bottom of this overlay window is a box indicating how many items are related to that accession number.
Clicking on this button will “flip” the overlay window, presenting you with a list of the items tied to the accession.
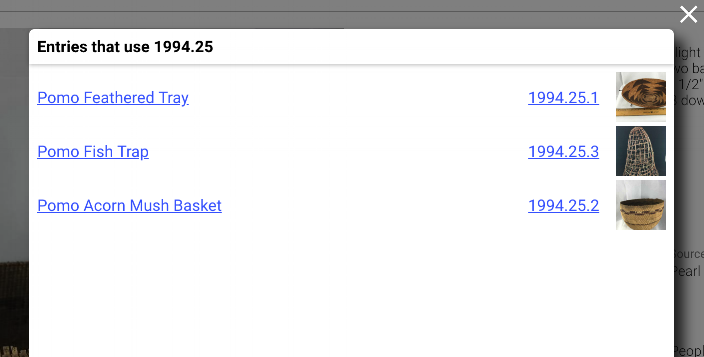
From here you can navigate to any of the entries by selecting them. Clicking the button at the bottom of the window will “flip” the window back to viewing the accession details.